Showing posts with label fab deals. Show all posts

Wednesday, July 31, 2013

The Dyesses: A Series of Interesting Events part 1


 Oh man, so much has happened in a short amount of time! First up on the calendar of special occurrences was the washer that had been given to us by our cousins decided it didn't want to stop filling up anymore.  It had already had a couple of other things go wrong and was pretty old. We knew it was just a matter of time before we would have to replace it, but we were fine using it up to the very last bit of its ability! :)  We had already decided that since we have a ridiculous amount of laundry to be done all.the.time, that when the time came to get a different one, we would invest in a front loader again.  I used to have one before our rv saga and I absolutely LOVED it.  Getting a brand new one was just not necessary as far as I was concerned because there is always a bounty of used goodness on craigslist. ;)

So, away my fingers flew on the keyboard and track pad searching through the previously owned offerings.  I was looking at either an LG set or a whirlpool duet set.  I wanted to go ahead and get a matching set since our dryer is the same age as the washer and the sets I was looking at were actually less expensive than some of the single washer ads.  I looked up the reviews on both sets to see if there was anything I should be concerned about with either of the models.  It was interesting to find such a huge amount of dissatisfied consumers of the LG model.  Granted lots of them were about the odor issue many have with front loaders and since I know how to fix that issue and avoid it in future, that wasn't as big of a deal, but there were plenty having to do with the actual mechanical and electronic parts not functioning properly.  I didn't really want to have to do a lot of youtubing how to videos on fixing it and ordering parts and all that, so I was relieved to find that the whirlpool reviews were mostly about the smell and not very many about the machine not functioning properly.

The lady that was selling the whirlpool set was moving and I went to check them out to see if they would work and to make sure there wasn't anything wrong with them.  She was going to need them a couple more days to get all her laundry done, so it was kind of an interesting situation.  We paid a small fraction of what a new set would have cost, actually got them loaded in the van and with much strain on both mine and Sam's part, got them set up in the laundry area.  They can be stacked, so we did that and it freed up quite a bit of space for a new laundry system that will be put into place soon.  Something very similar to this:


I will have the six baskets, but it will be all one unit.  I am going to add casters to the bottom and a counter to the top for folding purposes.  I already have the baskets, I just need to have a good chunk of time to cut up some plywood and 1 by whatevers and assemble it all.  I'm hoping this will be a better system than the dirty-clothes-baskets-in-the-closet a.k.a clothes-all-over-the-floor one we've got going on now.

I was loving washing the first couple of loads when I noticed water coming out from under it.  Not a lot, but there was definitely a leak somewhere.  Ugh.  So, I let Sam know about it and started looking up possibilities for the problem.  He said he noticed a small tear in the drum seal and thought that might be it.  I took a look at it and found it, but couldn't tell for sure.  I found a suggestion that it might be the water pump or it could be that the drain filter was clogged.  That one was an easy fix, so I took the front panel off and undid the filter basket.  There was a big wad of lint in it and some coins.  I was hoping this was the problem.   I didn't think the pump was because it wasn't make any non-normal noises.  I cleaned it all out and put it back in and did another load.  I thought it was good until I saw the water coming out again.  Bummer.  At least the panel was still off, so I could see where the leak was.  Sam was right, it was coming from the seal area.  I knew ordering the drum seal would take a while and to be honest, I didn't want to have to pay $70 bucks for one right after we just bought the washer!  So, I had it in my head that there had to be a way to temporarily patch it. ;)  I was thinking possibly one of those pool float patches or something similar.  I actually came across a suggestion of duct tape and thought why not?!  The stuff we have in the garage is the very thin cheapo stuff, but it would just have to do.  I put a little piece on the tear and did another load.  It worked!  Sam was pretty sure it wouldn't hold very well for very long and suggested a stronger tape like Gorilla Tape.  He was right on.  After a couple of loads the leak was back so, I picked some Gorilla Tape up while I was at Lowe's and put a piece over the tear when I got home.  That's been a little over a month ago and its still holding strong.  I'll eventually replace the seal (I've already watched several how-to videos and even found one where I don't have to take all the panels off of the top and front of the machine!), but for now we are good. :)

To Be Continued...

Wednesday, May 23, 2012

Recent Projects

I've been busy as usual, but I haven't really been putting my projects on here, so I will do that now.  I have other posts in progress, but there's a bum-load of pictures involved so it just takes a while for those. ;)

Today, I finished pillow mattress #2.  I saw the tutorial on them here at Southern Disposition's blog and was pretty excited when I saw her materials list.  She got 1 twin duvet cover and four 99 cent pillows from Ikea.  Well, I just had to go ahead and pick that up while I was there about a week or so ago. ;)  Her cover was cheaper than the one I found, but for less than 20 bucks, I got two out of 1 cover and 8 pillows.  I still can't get over the 99 cent pillows.  99 CENTS! I am in total like with Ikea. :) Anyway, here are the ones I made:


I also had to make up some hair bows for a little girls birthday a couple of weekends ago.  I hadn't made any in quite a long time, so I had to get back on youtube to have a refresher course.  I must say that these turned out waaaay better than the first set I made a year or so ago. :)  I also like that they are more over the top than the others, too.  Big honkin' bows on little girls heads just = cuteness to me.  Here they are:


I got some super cheap sheets at Ikea while I was there because I had seen this Super Hero Fort Kit on Meg + Andy blog and knew I needed to do that for the boys...well, at least part of it.  They kept taking the sheets off of their beds to build forts and it was getting really old trying to put it all back together all the time. :(  Anyway, at first we used clothespins to hook it to the bunk beds, but between Brea's and Ailey's efforts, it kept getting pulled down.  I had just bought some rope for use at our homeschool group field day and wrapped it "strategically" around the bed and just draped the sheets over the ropes.  Aaaahhh...much better.  That solved the problem of having to go in a bazillion times at bed time to fix the fort.  Here's what the kids have done with it so far:


Braden used the excess rope end to make a divider inside, too....

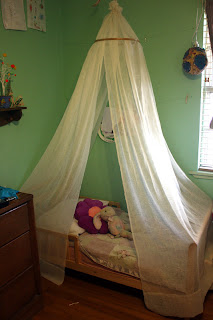
After making that, Ailey wanted one for her bed, so I set out on Google to see what others had come up with.  I was looking for something that didn't require sewing and used stuff I already had.  I came across this idea here at The Better Nester.  I didn't do it exactly, just used it to stimulate ideas to use with what I had.  I may or may not do more to it...works just fine the way it is.  Here is what I came up with so far:


Our yard was in VERY sad shape after the drought last year, so I went to work taking dominion over that thang! Its finally starting to make a comeback, but it will need more time.  Also, the garden is in process, as usual....I think I'm going to have to start it in November for it to produce anything in the spring. ;)  Anyway, here is all of that in progress:

The front porch had that icky green fake grass outdoor carpet covering it and I decided it just needed to get taken off.  It had it on the back porch, too, and after just letting the weather do it thang to it, all the gunky glue came mostly off of it after a while.  I figure by the time I get ready to clean it off really good and stain it, I won't have much scraping to do. ;)


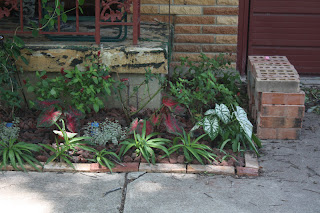
This is the front right flower bed.  I took out all the bulbs that were in it, took out the fluted brick edging that didn't match and looked dated and then attempted to restore some order there.  There's a rose bush taken from a random spot in the front yard as well as some type of flowering plants taken from the back yard.  I had gotten that honey suckle last year and just planted it there in the hopes that it would survive and it did.  Yay!  It is now being trained up the railing.   The border plants next to the bricks I got from one of the other flower beds and I have no idea what they are, but they make a nice bushy border. :)  The bricks were free from a friend.  I also put a soaker hose we already had and lava rocks in.   All the beds were in chaos.  Lots of overgrown and not taken care of going on in them.  Slowly, but surely I am going through each of them and rearranging and adding a bit.  

 This flower bed is to the left of the front porch and it had some really sad looking hawthorn bushes in it.  There are still two left that are giving me a run for my money, but they WILL come out!  Also, where the drain spout it was all loaded with dirt from many years of build up and when I got a hold of it, I found all kinds of buried bricks and stone.  I just dug them out and put them back on top in an orderly manner.  Much better.  I put stepping stones all the way around so I can get to the other beds without tramping on the grass trying to come back in.  I aim to bury one per day until they are all mostly level with the top of the ground to make mowing easier.  I've got them going out to the mailbox, too.

 That pile of bricks there came from our neighbor behind us.  They were free, too. :)  They will be going in as the border for the other front flower beds.

There are some of the bare spots with new grass coming up.  It looks kinda pitiful now, but it was worse. 

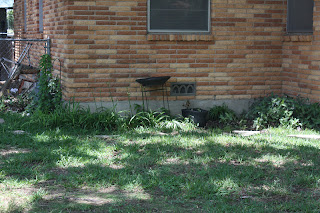
 This bed is going to be a challenge...There are lots of bulbs in it, mostly tiger lilies.  I have to dig them out and try to dig out that wandering jew, too.  I don't want it in there, it just takes right over. :(  I have some irises and amaryllis in the back yard and will rearrange this bed to accommodate them all, but much more organized.  There are also some chrysanthemums on the side of the house that will find a new home here. :)  That black bowl thing is my place marker for a bird bath.  I am on the lookout for one...preferably a cast off that won't cost a thing. ;p

This bed has a rose bush and jasmine.  I would like to get some sort of wrought iron gate thing or some sort of large trellis to create a bit of privacy there.  We shall see what comes my way. :)

Ailey had to be in most of the pics...:)  This is the back yard in all of its skeeriness.  The kids have really done a number on it.  That HUGE bare spot is being worked upon now.  Gonna see if I can coax some grass back in there.  Eventually, the plan is to make a semicircular patio with a pergola over it off of the small back porch there.  We'll see. 

 The garden.

 Herbs are up at the front there and there is some lettuce and kale in the middle and garlic at the other end with the rest being tomatoes.  The big huge bush there is oregano and it likes to take over.

The pot has Sam's habanero plant from last year.  He hasn't given up on it.  It has lots of blooms, but something keeps eating the little peppers on it. ;)  Poor Sam!  The bed has strawberries, okra, more habaneros and zucchini.  There was more planted, but it hasn't shown up as of yet.  I'm probably going to have to start those inside and see if I can get them to grow.  I may not, though....depends on whether I feel like it or not. ;)

We've also got a lot of remodeling going on inside the house, but most of it is in mid process.  I still have to finish getting the wallpaper backing off the walls in the bathroom and then I will texture and paint.  I have to sand and repaint the cabinetry, too.  I am considering putting in an exhaust fan, so before the texturing and painting, I will have to cut into the wall to run the wires and also cut a hole in the ceiling.  Then, I would have to patch the wall.  It would be a good thing because there is no ventilation in the bathroom if the window if closed.  

Sam is venturing into building a bigger pantry out of the one that is in the front part of the kitchen already and the little inset prep area right next to it.  He's going to frame it out and then build some shelves in there and then he will install bifold doors there.  We are also going to get bifold doors for the other closet/pantry/craft room at the back of the kitchen.  We will replace the hot water heater door with a new door that matches the bifold doors, too.  Then, there will be texturing and painting going on for a while after that.  He also plans to cut out the subfloor and replace the terrible particle board with plyboard and then we will paint that and lay linoleum tile down.

In the meantime, I have been slowly refinishing the cabinet doors. Ugh.  Such a big, time-consuming job!  I am painting them an off white and replacing all the hardware.  I finished two doors and put a poly coat on them and I don't like it at all!  It has yellowed and the polycoat is streaked making it look even worse.  I'm gonna have to sand it and repaint without the poly.  I might put the poly around the edge of the back of the doors so that it won't stick when they are closed.  Again....big job.  In addition to that, I aim to refinish the countertops and backsplash.  I'm gonna kind of cheat a bit, if I can.  They are covered in formica, but it is stuck on solidly, so I am just going to sand and score it and lay granite tile right over it.  Should be interesting!  The backsplash will just have to come out and backer board and glass tile installed.

Once all that is done, we have the rest of the rooms to paint.  They just need it.  We are also wanting to paint the outside of the house a lighter taupe color that will complement the bricks and freshen things up a bit.  It sounds like a lot, but we just putter through it as we have time and money to get it done.

There are more ideas scrambling around my brain, but I will just wait and see if they come to fruition first......


Tuesday, October 11, 2011

Sleeping and Another Score!

I've caught Zekes sleeping on camera twice in the last week.


My mom has lots of pics of me sleeping throughout my years at home, but I don't tend to get my kids sleeping because I don't want to wake them up!  Its necessary for them to stay asleep! ;p  There is the whole issue of my sanity, you know!  Theirs, too, come to think of it. :)

Now for the score part.  I found this exersaucer on craigslist for $10!


Yep, I have an unabashed romance with craigslist! :)  But, seriously, $10?!  All I had to do was wipe it down and throw the seat and toys in the washer.  Yes, I did do that with the toys.  I don't have a dishwasher so I have to improvise at times.  Those delicates bags work wonders for lots of stuff!  The other kiddos like to play with it, too.  Not the delicates bag, the exersaucer.  I just got it yesterday and already it has been a rocket ship, a robot body and a trampoline for Zekey, a fun house for Ailey and Braden also got in it while the seat was still in the dryer and was being silly.  Good times!

I also found a crib bedding set on, yes, craigslist.  I had one from before Braden was born that my sister had gotten for me, but it had been through a lot and it was not really girly at all, so I had gotten rid of it a while back at my garage sale.  I decided that it would be a good idea to get a bumper for the crib so that I could have Brea start sleeping in the crib to get used to it.  (I want to transition her into another room soon.)  Well, I couldn't find just a bumper on craiglist and when I went online to see how much just a bumper was, the cheapest I found was $29+!  Seriously?  For a bumper?  I know you are probably asking, "Shelly, why don't you just make one yourself, since you are all up in that?"  Well, I will tell you why....I don't wanna.  I have other projects waiting in the who-knows-when-I'm-going-to-get-to-them wings and anyway, to go and buy the fabric and batting for it would still be more than $20+ with coupons and watching the sales.  (I just had an epiphany!  I may not be able to jump into the whole grocery couponing craziness, but I'm all about it when it comes to craft stuff and online discount surfing!  Yay!  Okay...where was I? Oh, yeah....) So, with that in mind, I will continue to justify my crib bedding purchase. :)  I had intended to see if I could get some bedding a bit at a time that would complement both Ailey's bed and Brea's crib.  I have never set up a nursery.  Never.  We never had a room set aside for a nursery.  When we had Braden, we lived in a one bedroom condo.  When we had Zekes and Ailey, we lived in the motor home.  Brea is the only one that has come home to a house.  Since we only have a three bedroom and I put my babies in a bassinet or pack n play right next to my side of the bed until they sleep all the way through the night...well, you get the picture.  Now, however, we have a girl room and a boy room.  I can at least get nice bedding for the crib for the time being, right?!  She'll be in it for another year or so at least.  Okay, so again, I found some on craigslist.  Here it is:

JoJo Designs Annabel Baby Bedding - 9pc Crib Set


It will go with the sorta shabby chic thing I'm aiming for.  It came with the diaper stacker, fitted sheet, quilt, bumper, toy holder thingy hanging on the wall in the pic, the heart pillow, bed skirt and the bumper.  It also has a valance, but where it says on the package that there are two, I think they forgot to cut it and so its actually one super duper long one. :) The lady bought it, then had a crazy pregnancy where muted colors messed with her mood and never used it.   She paid $169 for it and I paid $65.  I talked her down from $75.  I'm thinking that was a pretty good stinkin' deal!  AND, in my tradition of tweaking, if I ever get around to it, I can make something else out of it all....if.  Or, I can just sell it.  Whatever. ;p

Sunday, October 2, 2011

Score!

We got an Ikea Ektorp sofa fo' 50 bucks! and a Kirby 5G vacuum cleaner for...wait for it....wait for it.... THIRTY DOLLARS!!!  Yes, you read right, 30!  I need to get some bags and attachments for it, but THIRTY DOLLARS!!!  Just one more time: THIRTY DOLLARS!!!  Okay, I think I can continue in lowercase from here on out... ;p  A sweet lady from our homeschool group was needing to rid herself and family of some items and these two were among them and I swooped in like a buzzard on fresh road kill.  I'm not ashamed to admit it.  The funniest thing (as opposed to the usage of most funny in a recent, previous post) was that Sam was super excited about it.  He gets excited about things, but usually it is not outwardly visible.  It was this time concerning the vacuum!  I got it home and he went and got it and started putting it through it's paces.  It was funny to watch.  I think it will help to explain that Sam did a two-week stint as a Kirby salesman in our first year of marriage.  Though Sam is not in any way, shape or form salesman material,  it is a fantastic vacuum and its been our standard ever since and now God provided us the opportunity to have one for THIRTY DOLLARS!!  Apparently, I wasn't done with the caps button yet. :)


The couch was another interesting blessing/provision.  We were given a really nice couch when we moved in and we have been so grateful for it.  I was intending to paint the fabric a different color because it totally wasn't jiving with The Plan I'm working.  That, however would have been an involved process and lots 'o work.  I really wanted a less formal couch with a removable cover that I could wash.  Enter the Ikea couch.  I can get a custom cover for it from Ikea for a fairly decent price.  Anyway, I talked it over with Sam and we decided to sell the formal couch along with the two chairs that were also given to us for what it would cost to get a new slip cover.  I listed them on Saturday and sold the couch on Sunday!  I asked God if He would please send buyers for the items.  Yep, He wants to be involved in that stuff, too, folks!


This is the couch that we did have:


This is the Ektorp we have now:


God is not a wish dispenser, but rather he knows even our tiniest, piddley-est, silliest desires and at times when they co-incide with his plans/will for our lives He blesses in very neat, creative ways.  In addition to that, He blesses us for His purposes and I'm interested and fairly curious to see what will be required of us involving the vacuum and couch and most probably our house and generosity  (we've been blessed and provided for LOTS)...we shall see!